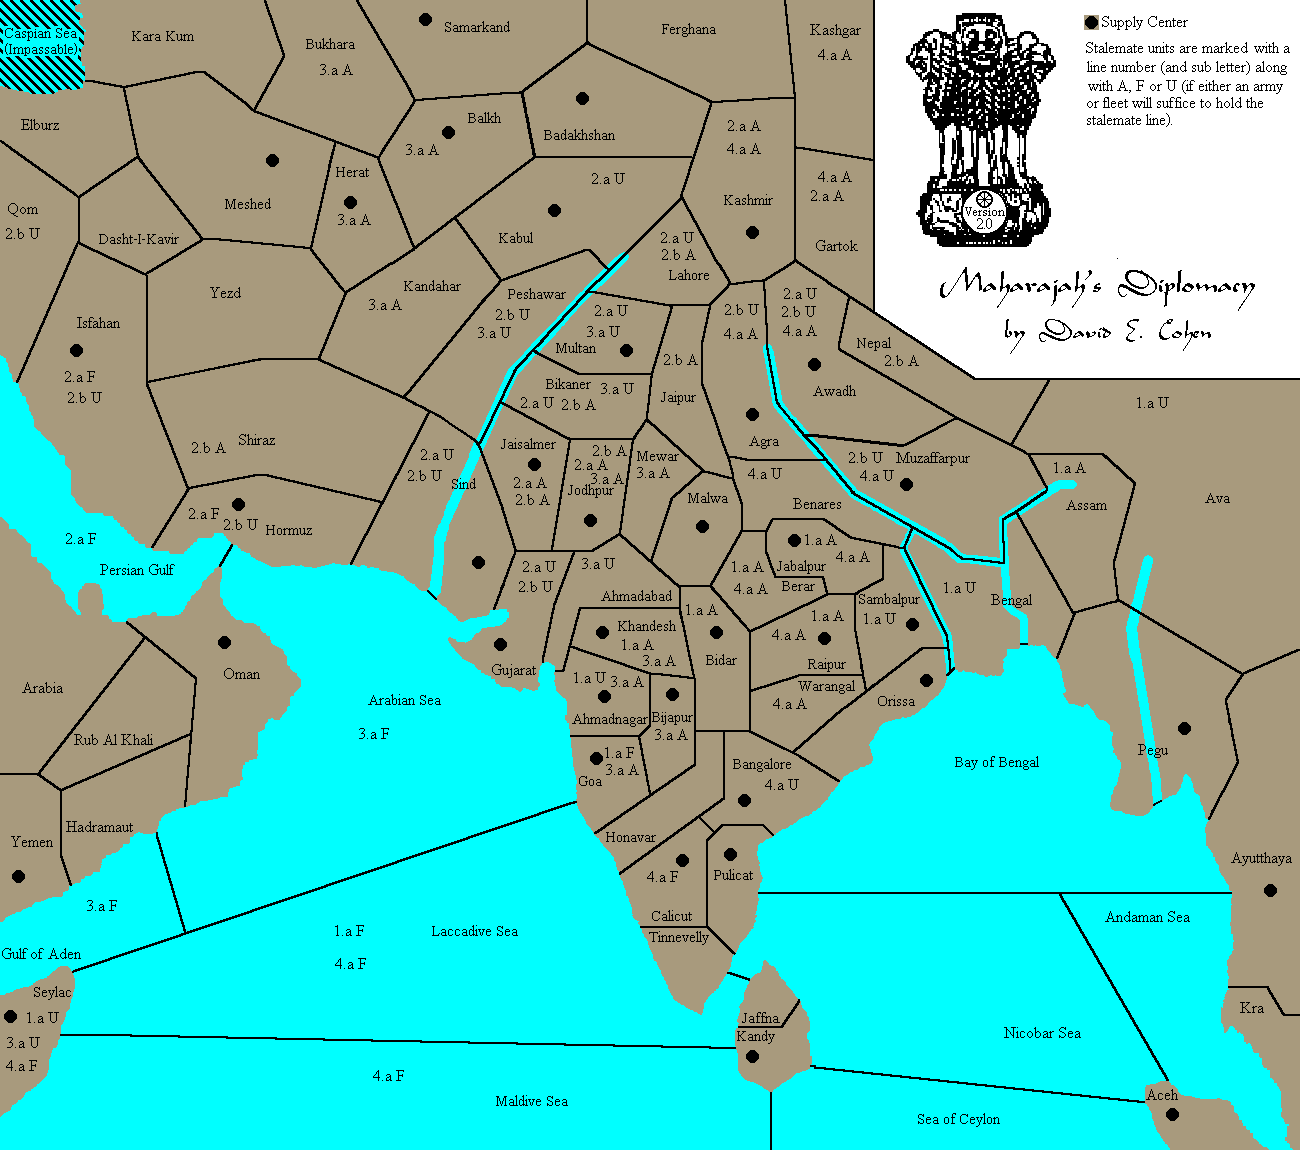
Stalemate Lines in Maharajah's Diplomacy Version 2.0
by David E. Cohen
I have attempted to minimize the influence of stalemate lines on the
game in order to discourage draws and encourage wins, both through the variant rules (the special build rule helps), and through
the map design. There are, however, still several "families" of stalemates around. While "majority" stalemate
lines (those containing 19 or more Supply Centers) are fairly common, if those holding the majority do not have the motivation
to attack either each other or (more importantly, I suppose) the Power(s) holding Supply Centers outside the stalemate line,
it really wouldn't matter if there were no stalemate lines present at all. In any event, though David Norman has pointed
some out, detailed research has not been performed at this point.
With regard to "minority" stalemate lines (those having 18 or fewer Supply
Centers), Paul Stuckwisch and I have found four families, those coming basically in pairs, with northern/southern and eastern/western
orientations. Interestingly, there is not much overlap between the members in each pair.
No stalemate line has yet been found which holds less than 15 Supply
Centers. The stalemate line which requires the smallest number of units to hold it needs 13 to hold 17 Supply Centers.
As Paul Stuckwisch has commented, any Power holding one of these lines would be very close to winning, and having one of these
lines figure significantly in the outcome of a game should be rare. I am glad to say that I agree with his conclusion.
A Power holding one of these lines, which are not that easy to get to, would probably be more interested in moving past the
stalemate line and going for the win, rather than falling back on it and agreeing to a draw.
Each stalemate line family is discussed in turn, and there will
be a map at the end of the discussion plotting out one or two typical stalemate lines for each family, as an aid to visualizing
things. I will use the symbol "U" for those instances where either an army or a fleet could be used to hold the province,
and where an order is not completed, that will signify that only the unit's presence is required, not a specific order for
the unit.
1. The Serendip Lines (southern stalemate positions):
1.a The first stalemate line discovered for Maharajah's Diplomacy 2.0
(by Paul Stuckwisch).
A Assam-Supports U Ava
U Ava-
U Sambalpur-Supports U Bengal
U
Bengal-
A Jabalpur-Supports A Berar
A Berar-
A Raipur-Supports A Bidar
A Bidar-
A Khandesh-Supports U Ahmadnagar
U
Ahmadnagar-
F Goa-Supports F Laccadive Sea
F Laccadive Sea-
U Seylac-
In this case, 13 units holding 17 Supply Centers. Variations including
more or fewer Supply Centers are possible (holding or losing Malwa, Yemen or Seylac), including some majority stalemate lines.
Unit placement and type can vary. For example, if the unit in Seylac is a fleet, the unit in Goa could be an army.
2. The Oxus Lines (northern stalemate positions):
2.a The smallest known northern line.
A Gartok-Supports U Awadh
A Kashmir-Supports U Awadh
U Awadh-
U
Kabul-Supports U Lahore
U Lahore-
U Multan-Supports U Bikaner
U Bikaner-
A Jaisalmer-Supports A Jodhpur
A Jodhpur-
U
Sind-Supports U Gujarat
U Gujarat-
F Hormuz-Supports F Persian Gulf
F Isfahan-Supports F Persian Gulf
F Persian
Gulf-
Here, 14 units hold 15 Supply Centers, but again, variations including
additional Supply Centers (Muzzafarpur, Oman, Yemen, Seylac are possible), including some majority lines.
2.b An interesting variation, the only one known to be possible
using only armies (no stalemate lines have been found where only fleets may be used), though as indicated, fleets may be used
in certain spots.
A Nepal-Supports U Muzaffarpur
U Awadh-Supports U Muzaffarpur
U
Agra-Supports U Muzaffarpur
U Muzaffarpur-
A Lahore-Supports A Jaipur
A Multan-Supports A Jaipur
A Jaipur-
A
Bikaner-Supports A Jodhpur
A Jodhpur-
A Jaisalmer-Supports U Gujarat
U Gujarat-
U Peshawar-Supports U Sind
U
Sind-
A Shiraz-Supports U Hormuz
U Hormuz-
U Qom-Supports U Ishfahan
U Isfahan-
Using only armies, 17 units can hold 17 Supply Centers.
3. The Coromandel Lines (western stalemate positions):
3.a The first western line found.
A Bukhara-Supports A Balkh
A Herat Supports A Balkh
A Balkh-Supports
A Bukhara
A Kandahar-Supports U Peshawar
U Peshawar-Supports U Multan
U Multan-Supports U Peshawar
U Bikaner-Supports
U Multan
A Jodhpur-Supports A Mewar
A Mewar-Supports U Bikaner
U Ahmadabad-
A Khandesh-Supports U Ahmadabad
A
Bijapur-Supports A Goa
A Goa-Supports A Bijapur
A Ahmadnagar-Supports A Bijapur
F Arabian Sea-Supports A Goa
F
Gulf of Aden-Supports U Seylac
U Seylac-
17 Supply Centers held by 17 units, with possible additional or lost
Supply Centers (Samarkand, Kabul, Badakhshan and Seylac) including some majority lines.
4. The Malabar Lines (eastern stalemate positions):
4.a The first eastern line found.
A Kashgar-Supports A Kashmir
A Gartok-Supports A Kashmir
A Awadh
-Supports A Kashmir
A Agra-Supports A Kashmir
A Kashmir-Supports A Agra
U Benares-Supports A Agra
U Muzaffarpur-Supports
A Agra
A Jabalpur-Supports U Benares
A Berar-Supports U Benares
A Raipur-Supports A Berar
A Warangal-Supports
U Banglore
U Bangalore-
F Calicut-Supports F Laccadive Sea
F Maldive Sea-Supports F Laccadive Sea
F Seylac-Supports
F Laccadive Sea
F Laccadive Sea-Supports F Calicut
16 units holding 16 Supply Centers, with some variation possible in the
locations of some of the supporting units.